Getting Started
Contents:
- Install the OCP admin console
- Insert networks to define the realm boundary
- Insert credentials for jobs
- Enable jobs to start gathering content
- Verify access and connectivity
- Enable Dynamic Discovery
Install the OCP admin console
You can accomplish the steps below through the REST API, but the user interface is preferred the first time through the configuration process. So, let’s setup the admin console (i.e. Python local client):
- Download the OCP admin console from GitHub
- Drop it in a local directory
- Follow the simple GitHub instructions for installation
Example below is illustrated from a Windows machine, but the client works on Linux and Apple platforms as well.
Start the admin console from the command line:
-
> python .\adminConsole.py
Insert networks to define the realm boundary
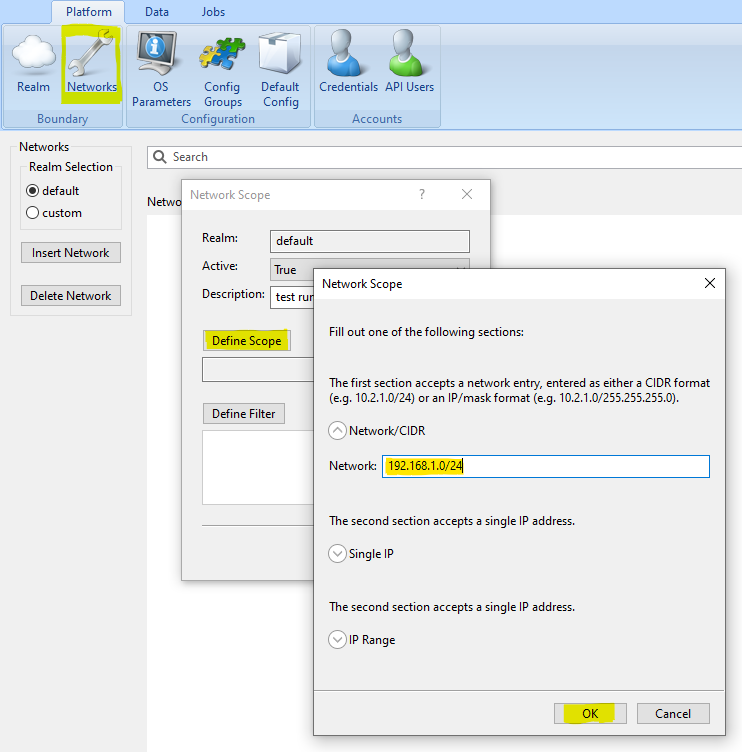
Add at least one network through the Platform-Boundary-Networks selection from the top ribbon, as shown in the following snapshot:
Insert credentials for jobs
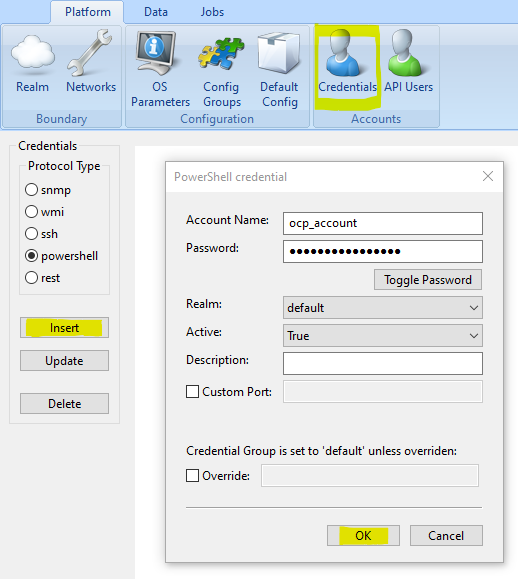
Add credentials through the Platform-Accounts-Credentials selection from the top ribbon, as shown in the following snapshot. SSH and PowerShell are used by the dynamic discovery jobs, so that’s a good place to start:
Enable jobs to start gathering content
Watch the demos for a detailed walk through (bottom of Core Framework and Discovery pages); continue reading here for an overview. Make sure you have the OCP app server running, along with at least one client for resultProcessing and one for contentGathering.
There are different ways for discovery to start running on endpoints. One way is to run a ping sweep across the networks previously defined in the realm, which is what we’ll use here.
For OCP versions 2.0 and beyond, where job control is managed through the API:
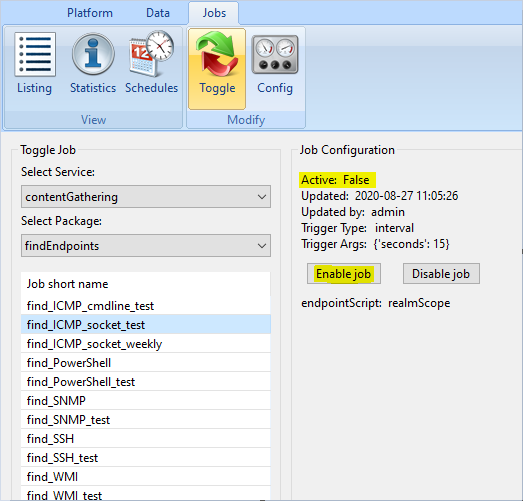
- Using the admin console, you can navigate to the Jobs-Modify-Toggle selection from the top ribbon. Select the “findEndpoints” package, followed by one of the ICMP jobs (find_ICMP_socket_test is shown below), and enable it. Note: by convention the “_test” named jobs are setup to run every 15-30 seconds, and are good to use for testing:
- Once the ping sweep starts, disable the ICMP job for now – otherwise it will continue to start/stop since the schedule is so short.
- Enable the “Find” jobs as desired. If you wish to use dynamic discovery, you can use find_SSH_test and find_PowerShell_test for quick verification.
For OCP 1.x versions, where job control was managed through the file-system:
- Go into the findEndpoints package directory on the OCP application server (.\content\contentGathering\findEndpoints\job\).
- Open one of the ICMP job definitions (e.g. find_ICMP_socket* or find_ICMP_cmdline*), set “isDisabled” to False and save. This will cause the job to run on the next scheduled cycle. Note: by convention the “_test” named jobs are setup to run every 15-30 seconds, and are good to use for testing.
- Once the ping sweep starts, you can disable the ICMP job for now; return later to modify the official job and create a desired long term schedule.
- Enable the “Find” jobs as desired. If you wish to use dynamic discovery, you can use find_SSH_test and find_PowerShell_test for quick verification.
Verify access and connectivity
Assuming access is in place, those will start to populate data. To understand when jobs kick off, you can:
- Watch the logs: (contentGatheringService.log or universalJobService.log on the server side, or a corresponding one on the client side like contentGatheringClient.log, contentGatheringJobDetail.log, contentGatheringJobStatus.log)
- Issue API requests: (/ocp/job/review/<service>/<job>, /ocp/job/runtime/<service>/<job>, /ocp/job/runtime/<service>/<job>/stats)
- Refresh the Data-Content-Objects selection within the admin console ribbon
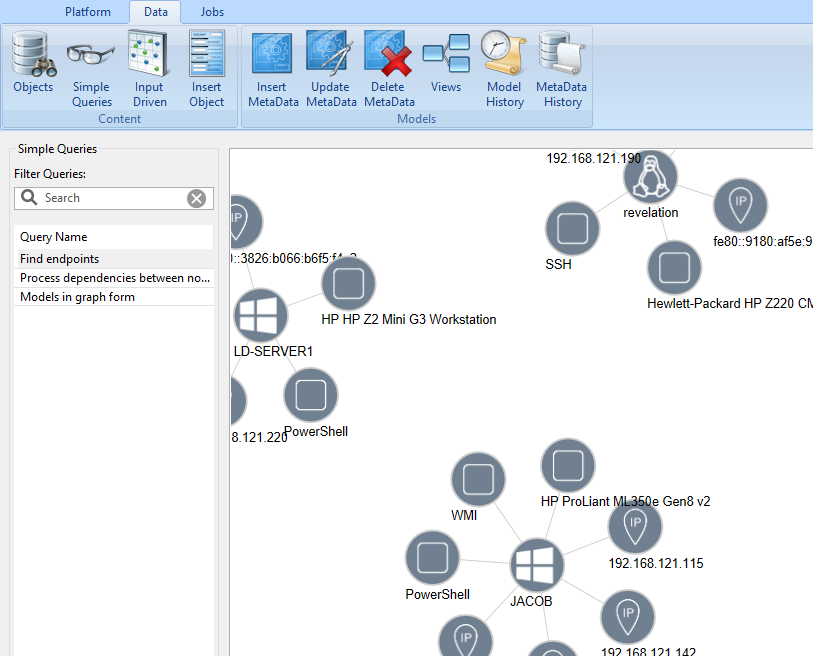
- Ensure endpoints are starting to show up in queries (pre-packaged or custom). For the “find” jobs, you can use the “Find endpoints” query shown below, available in Data-Content-Simple Queries section:
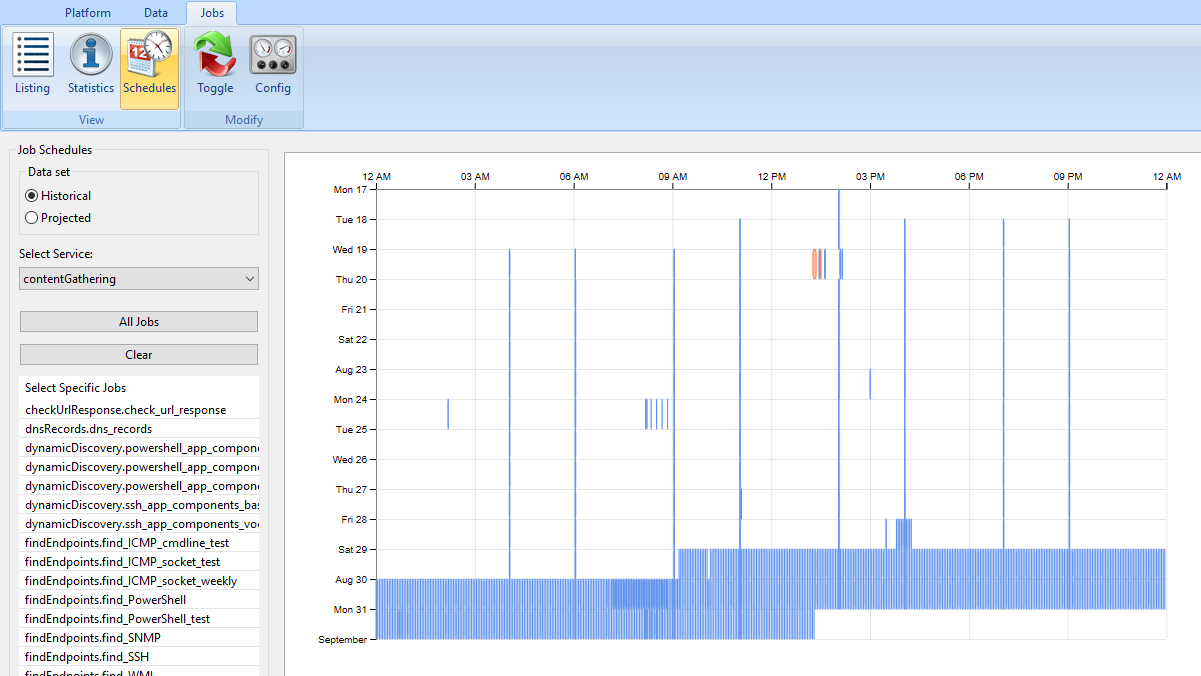
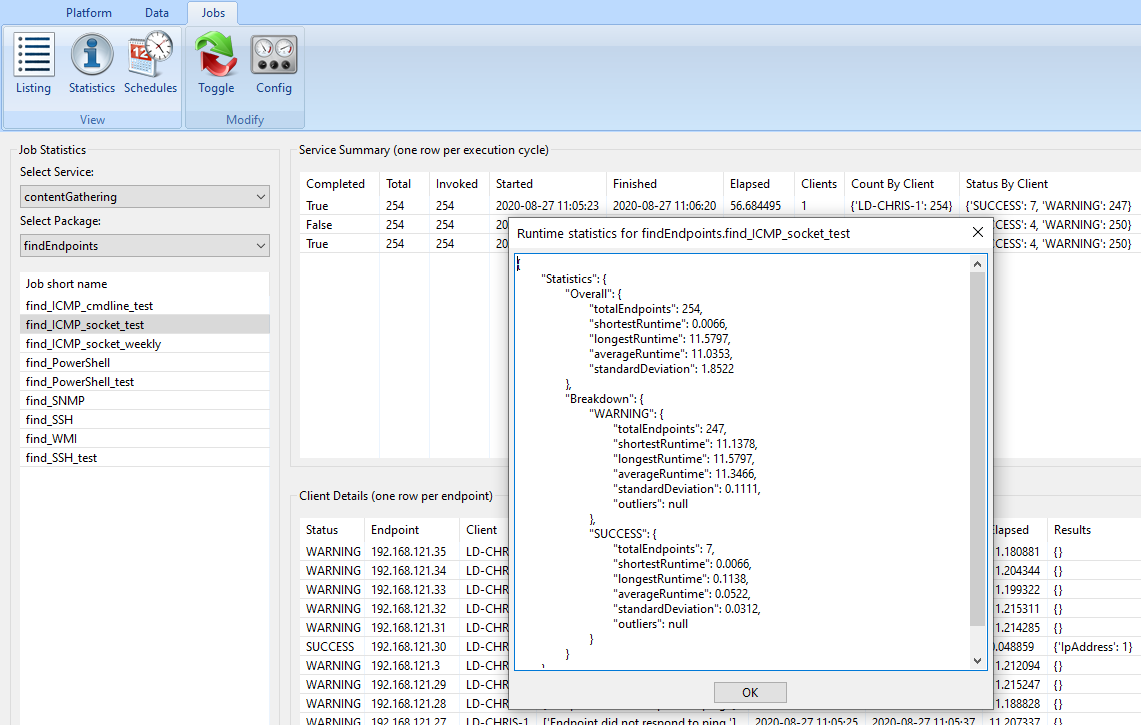
Eventually you will want to setup proper schedules for continued execution. The admin console provides different levels of visibility, such as the Jobs-View-Schedules and Jobs-View-Statistics shown below… though more is available from the API.
Enable Dynamic Discovery
- Shell connections are required for dynamic discovery. So after enabling the SSH and/or PowerShell type “Find” jobs to get a protocol connection and basic hardware/OS information across your environment, you want to template one of each server build type. Find a few targets by browsing the Find job data as described above. And write down some IPs you want to use for your targets.
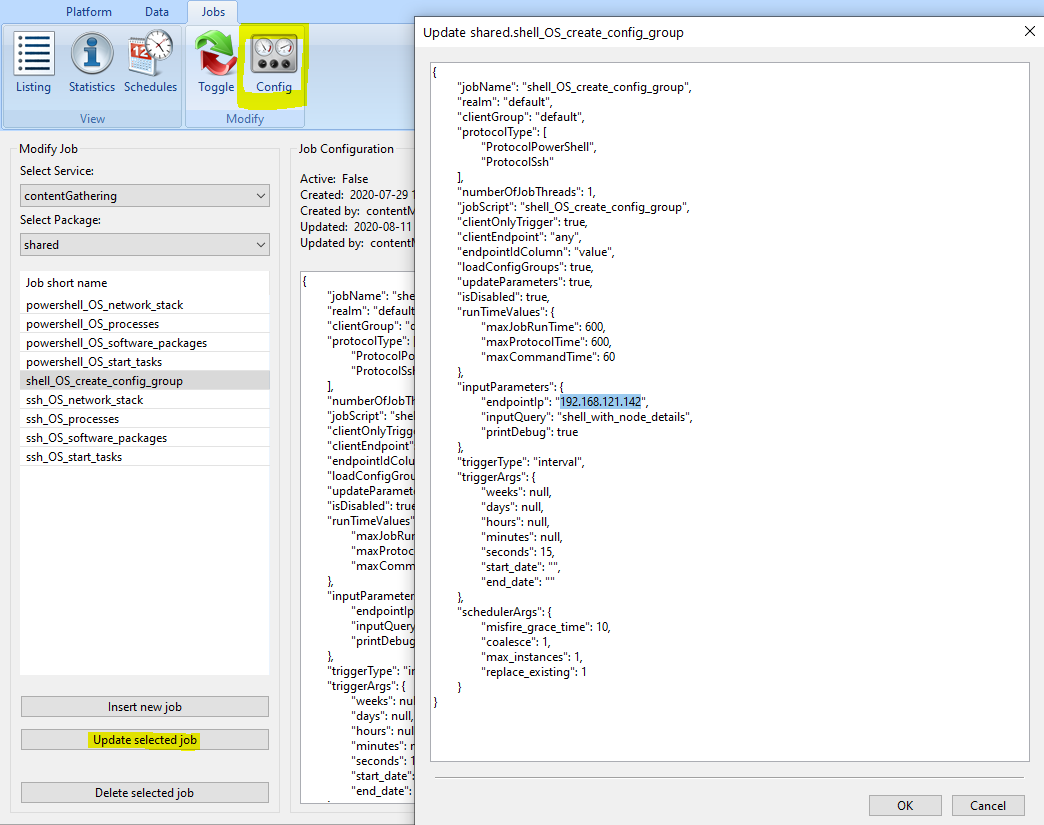
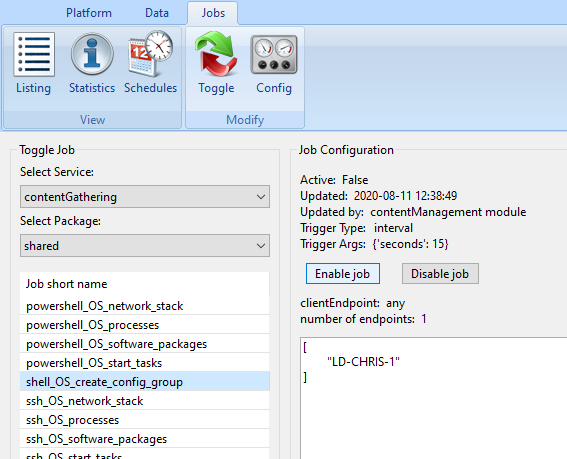
- Now open the template job (found here if using OCP v1: .\content\contentGathering\shared\job\shell_OS_create_config_group.json, otherwise refer to the pictures below). Modify the “endpointIp” in the inputParameters section and enable the job. Turn it back off, change the IP and repeat for each of the IPs you want to template. It’s best to do this for all combinations of major OS version, and Hardware types (whether physical or virtual).
- Take a look at the newly created config groups and tweak if desired (API requests to resource /ocp/config/ConfigGroups/default – or use the admin console as illustrated below).
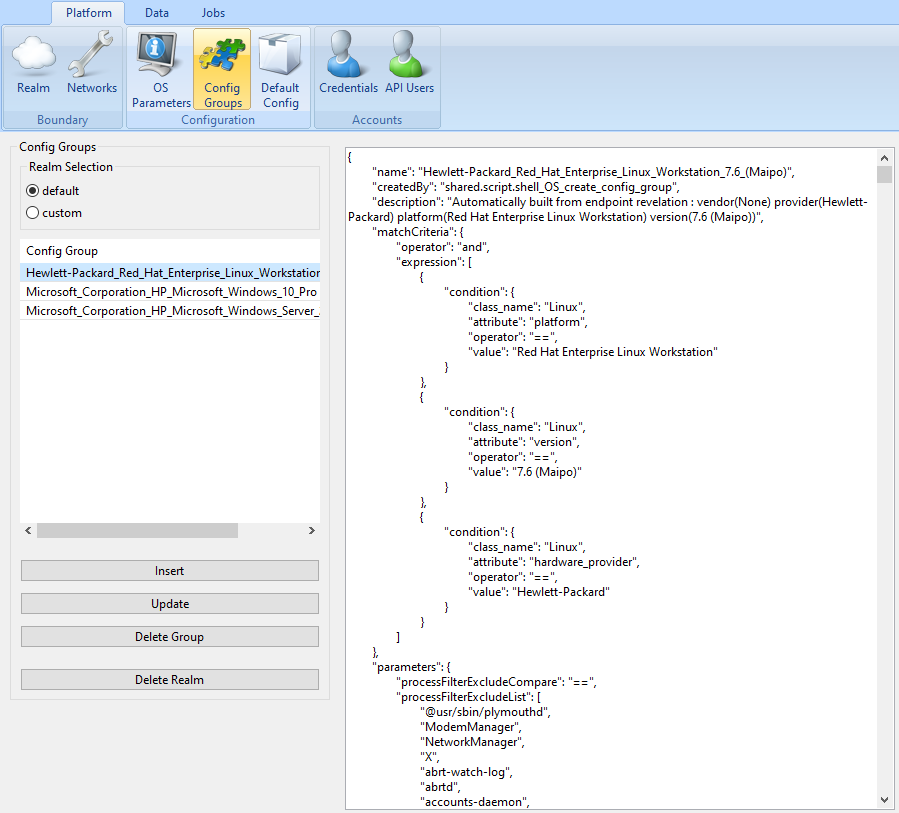
- Once you have templates for your OS builds, re-run the SSH and/or PowerShell type “Find” jobs. This will allow the Find jobs to not just establish a connection, but now also associate a config group to each OS instance. This tunes discovery to safely ignore basic software running across all your infrastructure (i.e. noise), while still allowing deep context on components that are not part of the base builds.
- Take a look at the PowerShell and SSH objects (GET request to API resource /ocp/data/Shell – or use the admin console) and ensure the “config_group” attributes are defined with your newly created groups. If they are still marked with a “default” group, they do not qualify for any of the “matchCriteria” sections of your current config groups… meaning you need to broaden the match criteria or create additional config groups.
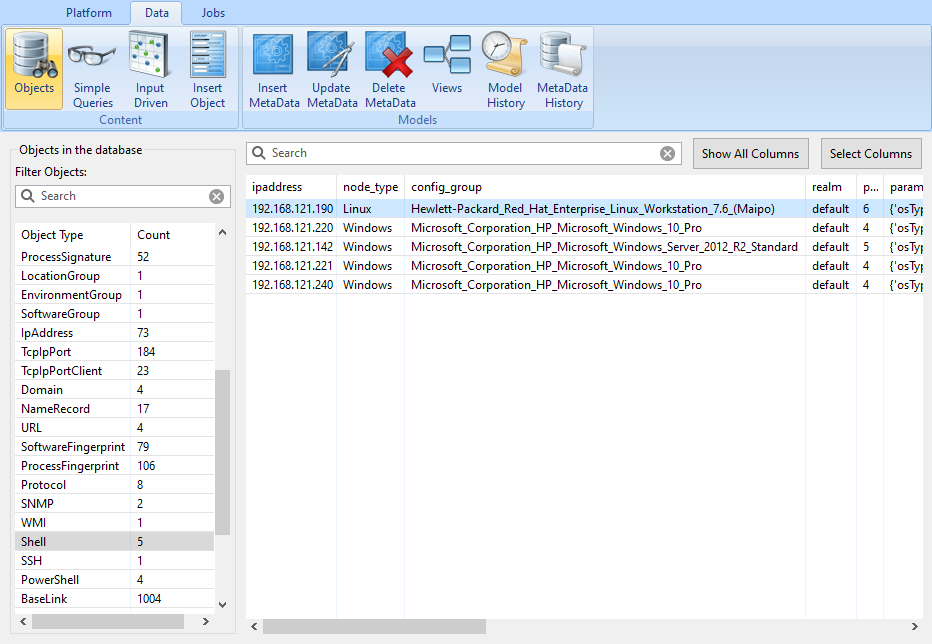
- Now you can enable the dynamic discovery jobs.
- Browse the SoftwareFingerprint and ProcessFingerprint type objects. Use the admin console Data-Objects pane to see listings, or view inter-dependencies with some of the Input Driven views. You will find software you likely did not know was running in your compute environments.
For additional direction, look at the Documentation, roll your sleeves up and jump into the code… or ask a question on the Community discussion forum.
